Pages
Pages in Sitefinity CMS represent the canvas on which you build and structure your website. In addition, pages contain the administrative and content authoring tools you use to manage your website, create and edit pages, browse and organize the structure and appearance of your website. Each page embodies a kind of structured functionality and information. You define the functionality of the page by adding widgets. Pages are:
- Frontend pages - these are all publicly visible pages from the project.
- Backend pages - these are all views in the administrative backend of a Sitefinity CMS project, such as the Dashboard, Content, Administration, and so on.
Define Appearance
Before you populate your page with content, you create a layout that helps the display of content. For example, you allocate space for the title, content blocks, and secondary navigation. To do this, you use predefined or custom templates, which you can modify if needed. You define the appearance and style of the page by setting the template.
Develop and Create
With Sitefinity CMS, content authors can create pages in a simplified and seamless manner. When creating a new page, you only need to provide the essential properties of a page.
Learn how to do it:
-
Create a new Page
- Click the Pages navigation menu item and then click the Create a page button.

- Type the page name. The page name will autogenerate the URL. You can edit the autogenerated URL if needed.
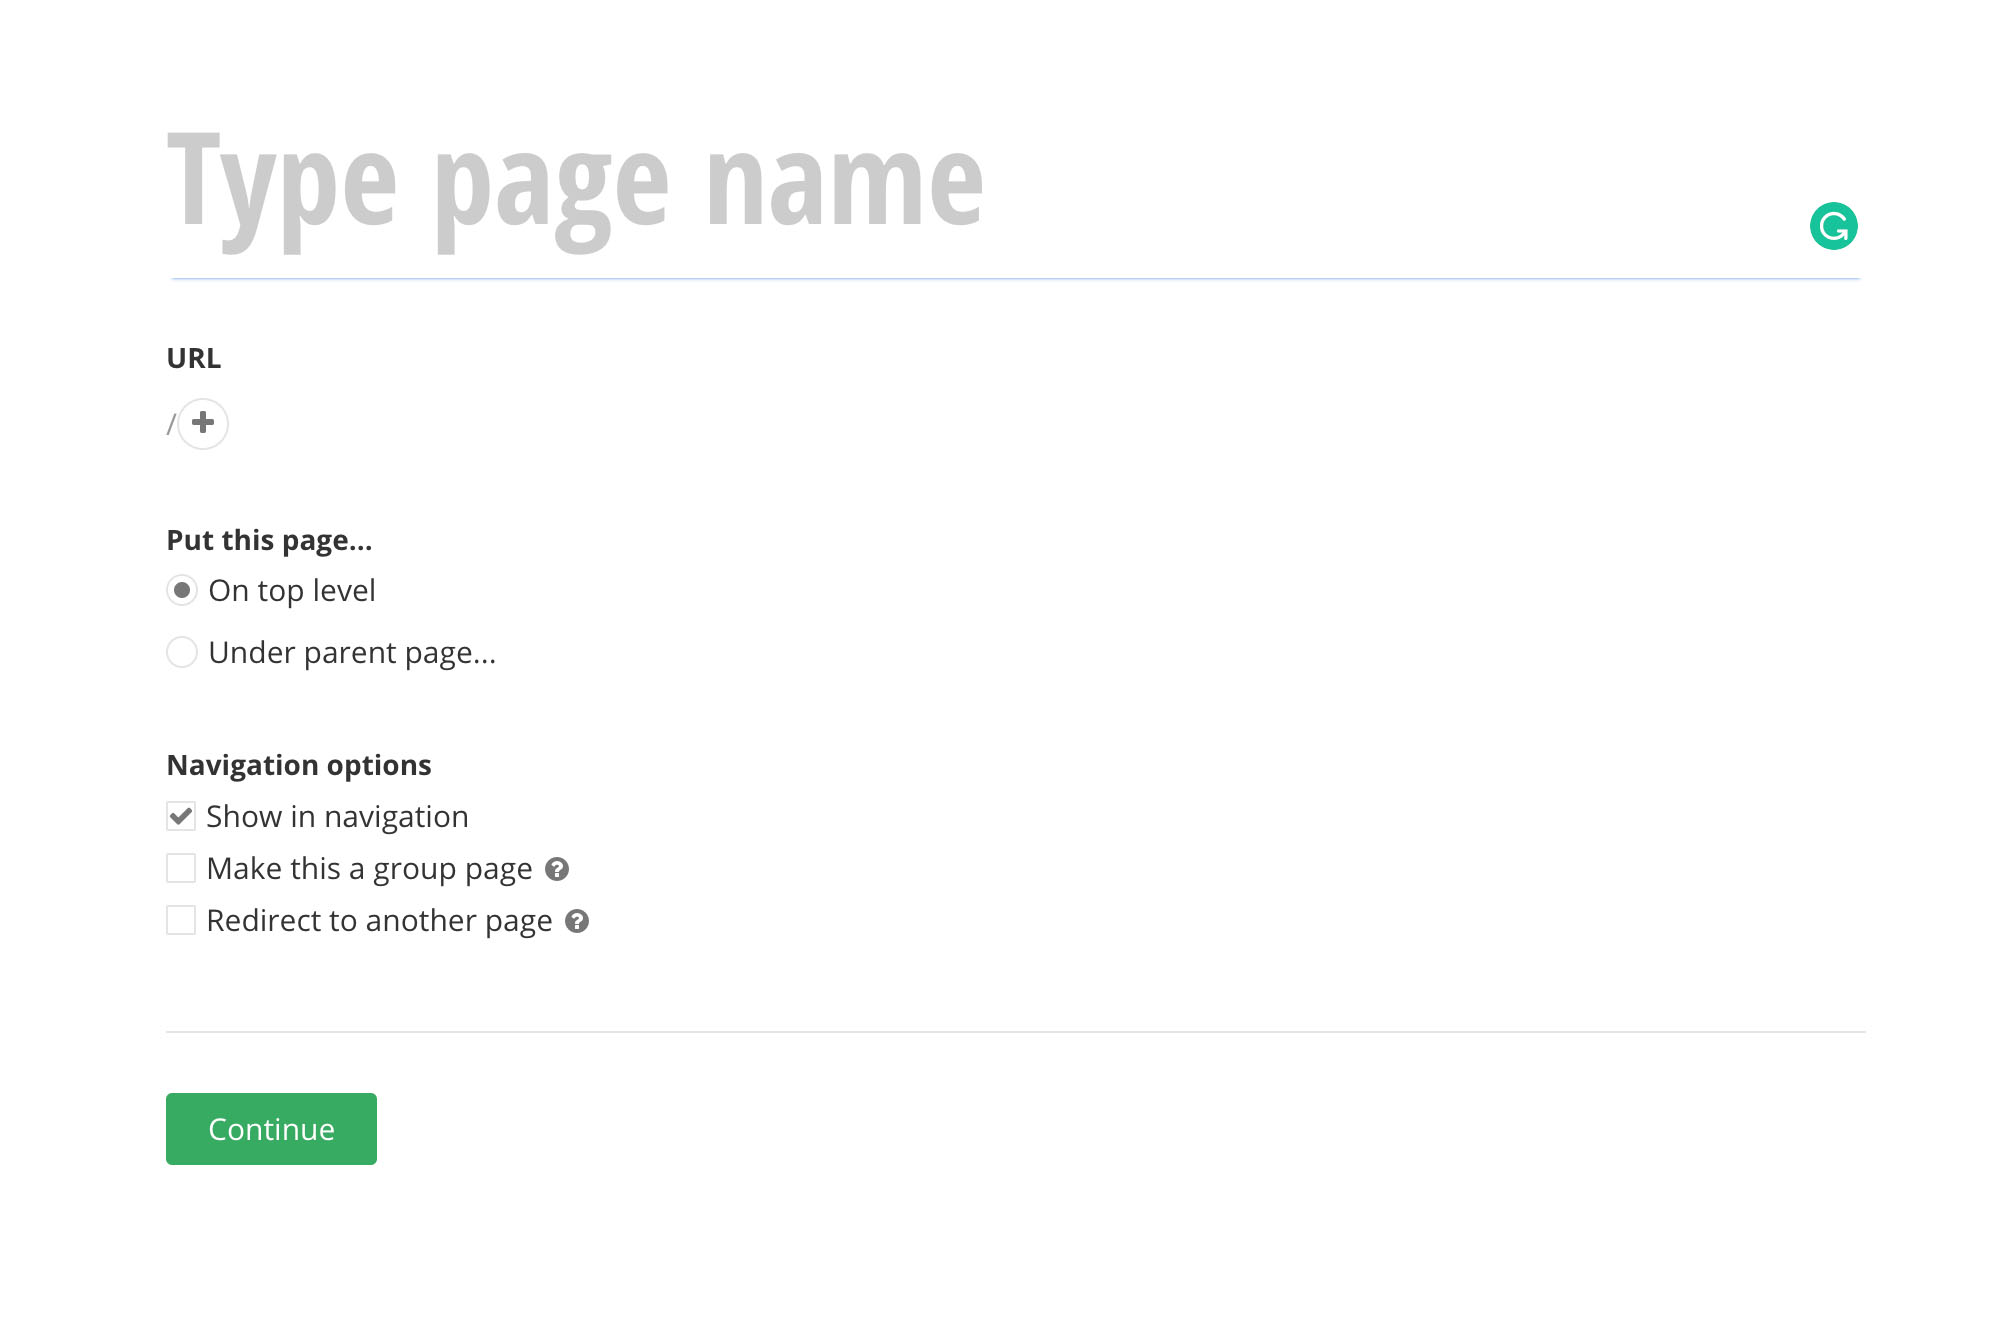
- Select where to put the page
- On top level: This will make it a parent page
- Under parent page: This will make the page a subpage of a parent page
- In the Navigation options section make a selection
- Show in Navigation:
Select this checkbox to make the page show up in the automatically generated navigation widgets. If the Show in navigation checkbox is deselected, the page is not displayed in the automatically generated navigation, and it can be viewed only if linked or accessed directly. - Make this a group page:
Select this checkbox to specify that the page is a group page. Group pages serve as containers for other pages. Group pages do not have their own content. When a visitor opens a group page, it redirects to its first subpage (child). - Redirect to another page:
Select this checkbox to specify that the page you are creating will not have its own content but will serve as a redirect page instead. Redirect pages serve as a placeholder in the sitemap, and redirect to another page from your website, or an external URL. To specify where your page redirects to, click (Select page). On the next screen, select a page from your site or use the Web address tab to specify an external URL to redirect to. Once finished, click Done.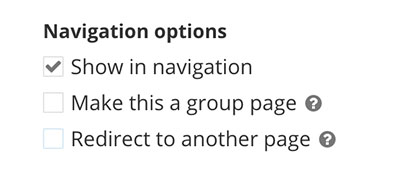
- Show in Navigation:
- Click the Continue button
- Select a template
- You can now start adding content to the page.
- Click the Pages navigation menu item and then click the Create a page button.
Refine Pages
At any point in time, you can further configure the page behavior by defining additional page settings. Once you create your pages, you can easily reorder and manage them from the list of pages screen. Searching for a specific page is made easy with advanced filtering and sorting options.
Learn how to do it:
-
Page title and properties
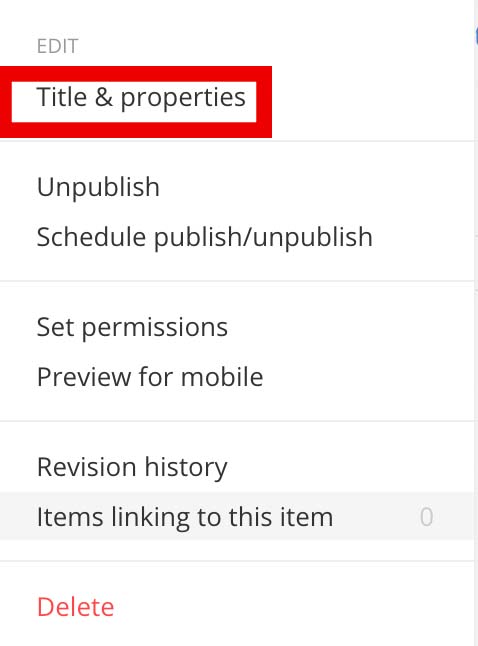
- Within the edit view of the page click the ellipsis symbol on the upper right-hand corner.

- Select the Title & properties option
- You can modify these page settings:
- Page title
- Page URL
- Select where to put the page
- Select Navigation options
- Add additional URLs: this will create redirect links to the page
- Within the edit view of the page click the ellipsis symbol on the upper right-hand corner.
-
Make a page a parent page or subpage
- Within the edit view of the page click the ellipsis symbol on the upper right-hand corner.
- Select the Title & properties option
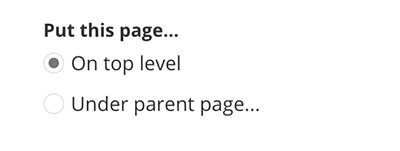
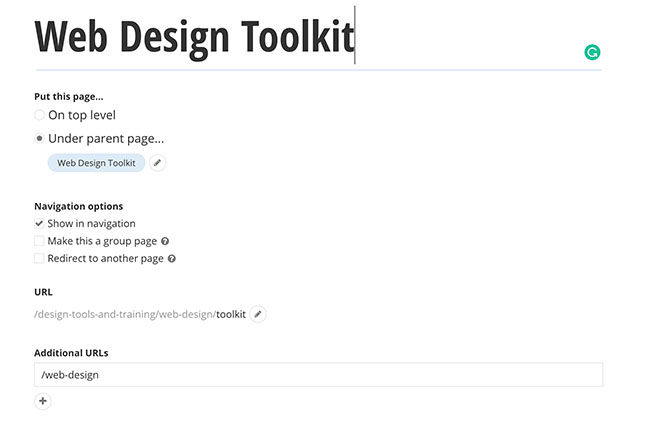
- In the Put this page... section:
- On top level:
This selection will make the page a parent page - Under parent page...:
This selection will make the page a subpage page of the page selected (click the pencil icon)
- On top level:
- Click the Save changes button when complete.
- Within the edit view of the page click the ellipsis symbol on the upper right-hand corner.
-
Page navigation settings (including redirects & group pages)
- Within the edit view of the page click the ellipsis symbol on the upper right-hand corner.
- Select the Title & properties option
- In the Navigation options section make a selection:
- Show in navigation:
Select this checkbox to make the page show up in the automatically generated navigation widgets. If the Show in navigation checkbox is deselected, the page is not displayed in the automatically generated navigation, and it can be viewed only if linked or accessed directly. - Make this a group page:
Select this checkbox to specify that the page is a group page. Group pages serve as containers for other pages. Group pages do not have their own content. When a visitor opens a group page, it redirects to its first subpage (child). - Redirect to another page:
Select this checkbox to specify that the page you are creating will not have its own content but will serve as a redirect page instead. Redirect pages serve as a placeholder in the sitemap, and redirect to another page from your website, or an external URL.
To specify where your page redirects to:- Click (Select page).
- On the next screen, select a page from your site or use the Web address tab to specify an external URL to redirect to.
- Optional: select the Open this link in a new window checkbox
- Once finished, click Done.
- Show in navigation:
- Click the Save changes button when complete.
- Within the edit view of the page click the ellipsis symbol on the upper right-hand corner.
-
Page URL settings
- Within the edit view of the page click the ellipsis symbol on the upper right-hand corner.
- Select the Title & properties option
- The page title automatically populates the page URL
- Type page name – enter the desired name of your page. The page name is used to identify your page in the Sitefinity CMS backend. It is displayed in the list of pages, different page selectors, navigation widgets and so on.
- In the URL section:
This is the URL name of your page. As you type the page name, URL is automatically populated. Sitefinity uses this URL to dynamically build the full URL of the page, so it can be accessed by website visitors.- If you need to change the auto-generated URL name:
- Click the Edit (pencil icon) next to it. Type in the new URL name
- DO NOT click the Edit Structure button to change the structure. This could cause issues with your page.
- If you need to change the auto-generated URL name:
- Click the Save changes button when complete.
- Within the edit view of the page click the ellipsis symbol on the upper right-hand corner.
-
Additional URLs for pages (shortened links)
- Within the edit view of the page click the ellipsis symbol on the upper right-hand corner.
- Select the Title & properties option
- In the Additional URLs section:
Configure additional URLs this page resolves on. The additional URLs resolve from the website root.- Add one URL per line. Add the URLs as relative URLs, (i.g. /contacts)
- Add one URL per line. Add the URLs as relative URLs, (i.g. /contacts)
- Click the Save changes button when complete.
- Within the edit view of the page click the ellipsis symbol on the upper right-hand corner.
-
Page Search Engine Optimization - SEO
The title tag and meta description (otherwise known as the "SEO title" and "SEO description") inform Google and other search engines about what the topic of your website is about. This information also shows up in the search results for users to see, and optimizing it can help them click through to your site.
- Within the edit view of the page click the ellipsis symbol on the upper right-hand corner.
- Select the Title & properties option
- Under the Search engine optimization section update per the guidelines below:

- Title for search engine:
This will autogenerate based on the page title. There is a 70 character limit.- Tips for title optimization:
- Aim for titles that are 50-60 characters
- Make your title tags unique on your website and on the SERP
- Follow basic writing etiquette and be honest
- Use keywords in your title tag (where appropriate)
- Tips for title optimization:
- Description:
There is a 150 character limit- Tips for description optimization:
- Use active voice and make it actionable
- Include a call-to-action
- Use your focus keyword
- Make sure it matches the content of the page
- Tips for description optimization:
- Keywords:
- Under the Custom fields section add concise comma-separated values to the Keywords field.

- Under the Custom fields section add concise comma-separated values to the Keywords field.
- Title for search engine:
- Click the Save changes button when complete.
- Within the edit view of the page click the ellipsis symbol on the upper right-hand corner.
-
Index page for site search and search engines
- Within the edit view of the page, click the ellipsis symbol on the upper right-hand corner.
- Select the Title & properties option
- Under the Advanced Options section:
- Allow site search to index this page:
This option is selected by default and you must deselect it, only if you do not want the internal site search to find your page in case, for instance, you have sensitive information on the page. - Allow external search engines to index this page:
This option is selected by default and you must deselect it, only if you do not want search engines, such as Google, to find your page in case, for instance, you have sensitive information on the page.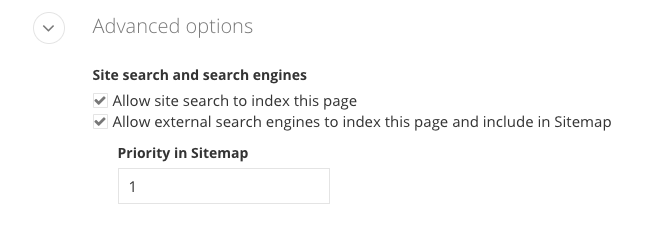
- Within the edit view of the page, click the ellipsis symbol on the upper right-hand corner.
-
Set a page as a homepage
On Pages page, the homepage of your website is represented by a home icon .
To set a home page, follow the instructions below:
- In the navigation, click Pages.
The pages management screen opens. - Click Settings for pages button
- Click the Set homepage.
- In the pages selector, select the page you want to set as homepage.
- To save your selection, click Use selected button.
The system sets the page as the website’s homepage and displays the icon above.
NOTE: If you do not explicitly set a page as homepage, the first page you have created is automatically set as your homepage. You cannot set a group page as a homepage.
IMPORTANT: You cannot delete the page set as homepage, unless it is the last page in the sitemap. To delete this page, set another page as homepage.
- In the navigation, click Pages.
-
Edit and save page content
You can edit the content of a page, such as layout elements and widgets.
- To do this, on the Pages screen, perform one of the following:
- Click the name of the page.
NOTE: If the page you have clicked is a group page, the system opens the Page title and properties dialog, where you can edit the properties of the page. - Click the (Actions) context menu of the respective page and click Content.
The page opens in content editing mode. In content editing mode you can Design a layout template and Apply a template to a page.
NOTE: A group page has no content and under Actions there is no Content link.
- Click the name of the page.
- When you are finished editing the page, perform one of the following:
- Save as Draft
- Publish
- Schedule Publish
NOTE: In page content editing mode, to see a preview of the page, click Preview button in the toolbar. The preview of the page is not a fully functioning page as it will appear on the live site. Use it to get an overall idea of how the page will look like. If you want to test how the page will look like and work of the live site, publish the page and click Live site in the upper-right corner of the screen. For example, if you use the preview mode, links to content items do not work.
- To do this, on the Pages screen, perform one of the following:
-
Delete pages
To delete a page, perform one of the following:
- On the Pages screen, select one or more pages to delete and from the Actions or Bulk Actions dropdown (depending on how many items you have selected), available in the upper left-hand side of the screen select Delete.
- On the Pages page, click the (Actions) link of the page you want to delete and click Delete.
A dialog box appears where you must confirm the deletion.
If you activated the Recycle bin module, the page is not permanently deleted, but moved to the Recycle bin. You can later restore or permanently delete the page from the recycle bin.
IMPORTANT: You cannot delete a parent page. If you want to do this, you must first move or delete all of its children.
IMPORTANT: If the page has translations, the system asks you, if you want to delete only the current translation of the page or all translations of this page.
-
Apply page templates to pages
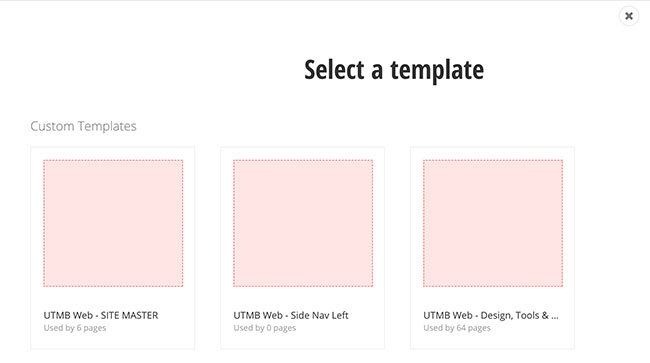
You can base a page on a page template in one of the following ways:
- When creating the page, you choose from the set of Sitefinity CMS page templates.
NOTE: You can select from MVC only templates. - Change the template of a page later
You change a template of a page in one of the following ways:
- On Pages page, click the Actions link of the page, whose template you want to change, click Template.
- In page content editing mode, click Layout in the toolbar and then click Select another Template button.
- Click one of the templates displayed.
Both predefined and custom page templates are listed and you can further customize or change the layout template later.
NOTE: MVC templates are designated with an MVC label. - Click Done.
The template is applied to the page.
- Click one of the templates displayed.
You can change between different templates of the same type. Placeholders with the same name or ID get the same widgets. If there is no such placeholder, new template widgets will be orphaned and you need to manually place them in another placeholder.
IMPORTANT: If you want to change the existing page template of a page, the system replaces the old template with the new one. All modifications of layout and content are preserved, and the new layout is appended to the existing.
- When creating the page, you choose from the set of Sitefinity CMS page templates.
-
Make a page viewable by UTMB employees only
- On the Pages page, click the (Actions) link of the page you want to lock down to UTMB employees only.

- Select Set permissions from the drop-down menu.

- Click the Break inheritance button

- Click the Change button under the View this page and its child pages section.
IMPORTANT: DO NOT edit any other settings
- Click the Selected roles or users radio button and then click the Add roles or users button

- Type in Authenticated in the search and then select that option. Click the Done selecting button.

- Click the Back to pages link at the top of the page and your page will now be locked down to UTMB employees only.
- On the Pages page, click the (Actions) link of the page you want to lock down to UTMB employees only.